Thursday 27 June 2013

Home brew tasting flight

I started brewing my own beer late 2012 with a new friend of mine Dave. We call ourselves D & D Brewing Co. We have finally brewed enough beers to have our very own tasting flight comprised of entirely home brewed beers! We were very excited. Although probably super bias... here is my review of 3 of our favourite home brews to date. 

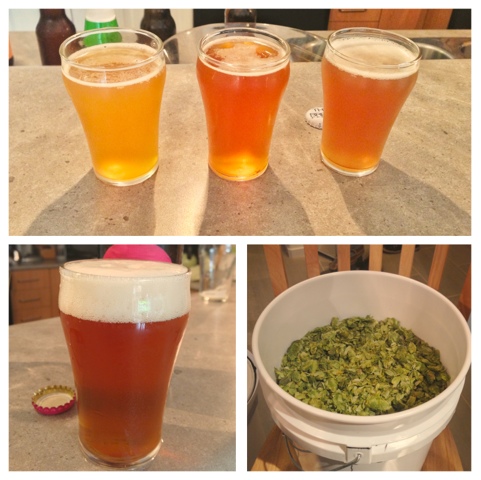
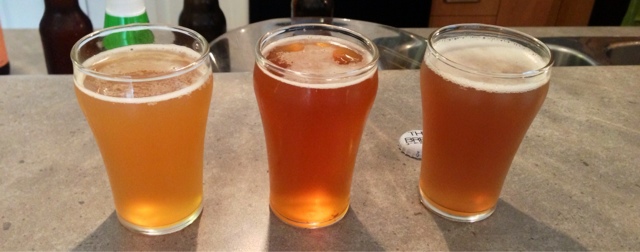
Starting from the right in the picture above. The "Oak aged 90 min MyPA" 

We started off, trying to clone one of our favourite beers from "dogfish head brewery" their 90 min IPA. This beer has a very sweet, thick malty ness, almost chocolate tasting, but with a very hoppy nose and wonderful bitter finish. This beer is unreal. It is boiled for 90 mins and is continuously hopped for the entire boil to achieve that amazing hoppy flavour. Then, it is dry hopped during fermentation with insane amounts of hops to give it that crazy aroma. 

Now onto our beer. We made 3 versions of the 90 min IPA. The first was an oak aged. In all honesty it tastes nothing like what we wanted, but is surprisingly awesome. It has a brilliant hoppy nose, with the addition of a little bit of oak. The malty ness isn't as pronounced as we would have hoped, but that was expected as we had some problems during there brew ;) overall this was a very pleasant beer to drink, no off flavours, very crisp and clean tasting with a nice hoppy bite. I enjoyed this beer very much and will be making it again. 

The beer on the far right, is the same beer, however it was not oak aged. So pretty much exactly the same, however no oak flavour or aroma, much more crisp, almost a slight apple flavour, in a good way, these beers came out to be about 7% ABV , so they have quite a decent warmth in the mouth as well! IBUs on these two is about 70. Honestly a beer I would drink every day. Sadly all 30 750mil bottles are gone. Only took like 2 weeks.. 

Finally, the beer in the middle. This one was just a sample of a beer we will be aging till the fall. It's an Imperial pumpkin pie ale. At 8.5% ABV, this beer is insanely awesome. It seriously tastes like a pumpkin pie. It's sweet, spicy, thick bodied, and has an awesome alcohol warmth, although the alcohol taste is quite hidden by all the spices. You can still tell its there. This is for sure a dessert beer. More than one might be a little much. We are really excited for this to age up nicely, we expect it to get a lot more body, and more of the alcohol taste will come through, balancing it out. 

Overall we have been really excited about all of the beers we have made so far, some have been a little crazy, the " Bloody Imperial pepper stout" has quite the story to go along with it, and almost one of my fingers, hence the name. It's and awesome hobby, I strongly recommend it to anyone who loves beer and loves the satisfaction of doing things them-self. 


Beer is just really cool.. I like it ;) 

Drink on friends, cheers. 


Thursday 20 June 2013

Espresso exctraction 101


I have come to discover, in my quest for the perfect shot of espresso, that there is just way too much info out there on the subject. It is very easy to get consused when first starting out. The company I work for has a very good training program, so for me it wasn’t too difficult. However for someone who finds all of their information on the internet, It is hard to weed through all of the confusing blogs, put out there by overcaffinated “home baristas”. Of course I am no professional myself, but the people a work for absolutely are, and I have learned alot from them. 

I have attempted to make explaining how to pull a perfect shot as simple as possible. Here is how I work things through my head everyday when I am pulling shots.

First, start by only worrying about getting the correct volume in the correct time. Which is 1.5 to 2 oz in 20 to 30 seconds. (for a double) Do this by only adjusting the grind. If your coffee is coming out too fast, make the grind FINER. If your coffee is coming out too slow, make the grind more COARSE. Whenever you adjust anything, temperature, dose, tamping pressure, always go back to this step, this is very important. 

If your shots look and taste like #2 (down below), DONT TOUCH. Magic is 
happening. ;)

If your shots look and taste like #1, but your volume is good, either your dose is too low, or your temp is too low. Adjust accordinly and taste. Continue till at #2 

If your shots look and taste like #3 and volume is good, then your dose is too high, or your temp is too high. 

There are MANY factors that can affect your coffee, age of the beans, roasting problems, weather outside... endless stupid things, other than always using the freshest possible coffee, you usually cannot do anything about these other factors. But you can control the dose, temp and grind size. 

So, all this as simple and short as possible. Assuming volume is always perfect .Over-extracted? Dose down, temp down. Underextracted? Dose up, temp up. Tastes and smells like sweet syrupy heaven? DRINK AND LEAVE BE.

In the end it all comes down to taste. Trust what your palate tells you. If you taste ashes, its probably too hot. If you taste lemon, its probably too cold! I believe if you follow these steps, and “follow your nose” you will figure it out sooner or later. I hope you enjoy your search for the perfect espresso as much as I do. Cheers. 


Saturday 9 February 2013

ART...ON COFFEE

Part of my obsession with coffee is the art of making a drink look good. Latte art is becoming more and more popular as baristas around the world try to express their creative sides through the canvas that is espresso in a cup. Creating latte art is a lot harder than it looks, in order to do it correctly, you must first perfect the texturizing of your milk. The perfect milk for art is creamy, shiny micro foamed milk, absolutely no visible bubbles. Once this is perfected, you begin your pour into the espresso with a thin slow stream from up high, slowly filling the cup you begin to thicken your stream of milk while very slightly waving the pitcher back and forth, hopefully, creating something beautiful in your cup! Practice practice practice, the only way to figure out how to do it. I have a ton of fun learning this art, below are some pics of my personal bests so far. 


Oh, and they taste really good too!! :) 

Cheers! 

Dave 

Tuesday 29 January 2013

Coffee Crawl

As part of my new job at JJbean, they want us to really get into the world of coffee by encouraging us to try out espresso at different cafes.  I have gone around to a few of my favorite cafes in Vancouver, and couple in my home town Kelowna, and written a small review of each based on just ordering an espresso at each cafe. 

Vancouver Cafes 

Matchstick Coffee Roasters 

Espresso served: Catalogue 

Aroma - subtle sweetness 
Taste - sweet fruit , thick Caramel. 
Body - buttery feel
Acidity- bright
Finish - short and pleasant 

Pleasant, easy-drinking espresso. As expected, it was served with water and a spoon on a saucer. Beautiful, thick crema with a subtle sweet aroma. It had a sweet, fruity taste along with a slight hint of caramel. The atmosphere in Matchstick is very much like JJbean; good music playing, really unique decor with exposed beams and brick mixed with clean white walls. I enjoyed matchstick very much. They have a large community table made out of a tree that really makes the space. They play their music from an old record player, on old Bose speakers which is awesome. Very kind staff, and overall a very enjoyable experience.


49th Parallel Roasters

Espresso served: Epic espresso

Aroma - sweet 
Taste - berry like sweetness and toasted almonds 
Body - creamy ..thick
Acidity - low acidity 
Finish - long lasting sweetness 

This espresso was very unique tasting, much different than the espresso I had just had at Matchstick. Presentation was very different, served on a wooden platter with indents for the espresso water and spoon - pretty cool. It was a very pleasant and easy drinking espresso but had very bold flavours. I tasted berries, mainly strawberry, and toasted almonds. The atmosphere in here is confusing to me. Kind of a mix between modern and sophisticated. Not as comfortable feeling as other cafes but the coffee makes up for it. The music, however, was wonderful - Iron and Wine, Sufjan Stevens, The Shins, Bright Eyes. 


Cafe Divano


Espresso served: 49th Parallel's "Old school espresso" 

Aroma - dark, cocoa sweetness 
Taste - dark caramel, dark chocolate 
Body - full and thick 
Acidity - low acidity 
Finish - short 

In all honesty, I was really not a fan of this espresso. Neither was the barista who served it to me, who was the owner of the cafe, and definitely knew what he was doing. It was quite dark tasting, very thick, and overall not very complex and simply not pleasant to drink. My personal preference in espresso is a sweet, complex, pleasant tasting drink that goes down smooth, without the need for cream or sugar.  However the cafe was very nice! Very cozy and the staff and I talked coffee for quite some time. A nice little place.


Kelowna Cafes

Streaming Cafe

Espresso served: Matchstick Coffee Roasters "Catalogue"

Aroma - subtle dark sweetness 
Taste - dark fruit , thick caramel. 
Body - buttery feel
Acidity- high to medium
Finish - short and harsh..

Streaming Cafe outsources their espresso from multiple roasters. The espresso they had on when I visited was the same as I had when I was at Matchstick in Vancouver. However it did not taste the same. It was similar, but over-extraction made it harsh and not as pleasant as it should have been. I could taste the similarities in flavour and body, they were just stronger, in a bad way. To be fair it is not always like this. In general, this place is my favourite spot in Kelowna for coffee and atmosphere. They have live music that they stream online from some really awesome artists. Every time I'm in Kelowna this is the only place I can find decent coffee! 


Bean Scene Coffee Works

Espresso served: No special name here. Just their "Espresso roast"


Aroma - roasty
Taste - dark toasted nuts/roasty taste
Body - thick 
Acidity- very low
Finish - short, unpleasant 


Bean Scene is one of Kelowna's only roasters. Their cafes are quite popular in the summer with the hippie scene, so most people avoid this cafe and head across the street to Blenz. I was quite disappointed when I finally went inside to try out this coffee which I had heard so much about. The espresso was roasted very dark, which in my opinion is just not nice. It was dark and roasty tasting, with an unpleasant feel and finish, and I dont think it was over-extracted, as I watched the barista pull the shot. Inside was just like I thought, dirty, smelly and just not nice. However!! They also have a location on the other side of town, where they roast their coffee, and it is awesome. You can see all the equipment out in the open in this high ceiling cafe/roastery. Cool place, not cool coffee.. In my opinion ;)


In summary, it was very interesting going to all of these different cafes and trying their coffee. I learned a lot about how different everyones tastes are and how different espresso can be from one place to another. I also realized the importance of knowing how to properly pull a perfect shot every time. This was a great experience that I will continue as I learn more and more about the coffee world. (JJbean is still my fave)

While the Vancouver coffee scene is obviously thriving, with an endless amount of unique cafes with amazing coffee to choose from, Kelowna is seriously lacking. This makes me sad, because I love Kelowna and would one day like to live there again. Come on Kelowna, get to it!! Maybe I will just have to do it myself...

Cheers!! 

Dave 

Thursday 24 January 2013

DIY Pallet Living Wall


Living walls, or vertical gardens, are the latest great design craze and have been popping up all over the place. While they are increasingly popular in businesses and public areas, these living works of art are also especially handy for people living in small spaces where space for plants is limited. Though they look gorgeous, aesthetics aren’t the only reason for putting up one of these babies: having plenty of green plants around can also reduce stress, increase wellbeing, purify and humidify the air, and dampen noise pollution! Getting a living wall professionally designed and installed can cost a fortune… luckily, this DIY version is quick, easy, and cheap! 


DIY Breakdown:
The Difficulty: Medium – you need to be familiar with some basic tools, and a considerable amount of strength is needed when things get heavy
The Time Commitment: Done in a day
The Look: Rustic and chunky, modern and on-trend
The Cost: Less than $100 (you’ll spend the most on plants)
Would I do it Again? Absolutely.


What you’ll need:
- Shipping Pallet (we got ours on the side of the road, outside a warehouse)
- Hammer
- Nails
- Thin wood or plastic roughly the size of the back of the pallet
- Landscaping fabric
- Plastic sheeting
- Staple gun
- Indoor potting soil
- Plants
*Optional:
- 3inch eyehooks
- Heavy weight bearing metal chain


Step 1:
Remove the slats from the top of the pallet. This can be a little tricky, but patience and creativity will get you there!
Step 2:
Cover the back of the pallet with the thin piece of wood, and nail into place. Then, cover the entire back of the pallet with the plastic sheeting and use the staple gun to secure. This will protect your walls from moisture!
Step 3:
Cover the back again, but this time with a double layer of landscaping fabric. This is mainly for aesthetic reasons, as the plastic is pretty ugly!
Step 4:
Measure where you want your slats to sit on the pallet. You probably won’t use all of the slats – try to leave at least 2.5 inches between each slat to make planting easier.  Mark where each slat will go with a pencil, but don’t nail them down yet!
Step 5:
Create the dirt pockets.  Using landscaping fabric, create a pocket on the underside of each slat. This is easiest when the slats haven’t been nailed down yet. We cut a strip of landscaping fabric, doubled it up, and stapled it first to the back of one slat. Then, we placed the slat down where we made pencil marks, and the stapled the other side of the landscaping fabric to the pallet. Repeat for each section. Make sure your pockets are deep enough that they will hold enough dirt, but not so deep that they will droop too much into the space below!
Step 6:
Nail down your slats!
Step 7:
Fill your pockets with potting soil, and start planting! We recommend doing this with the pallet leaning against the wall so that it is almost vertical.
Tip: Don’t overfill the pockets – the dirt should only come up to the top of each wood slat. Place the roots of each plant into the dirt on an angle and pack them in tightly.
Step 8:
Hang your living wall! This is optional, as they would look equally good propped up. We chose to hang ours using 3inch eyehooks and a heavy-duty chain. If you do hang your living wall, be sure to drill into studs so that the weight of the garden doesn’t rip out your drywall.


That’s it! Enjoy your new recycled living wall!